Introduction
Elbow arthroscopy is a technically demanding procedure due to the small joint space and the close proximity of major neurovascular structures. Careful patient positioning, portal placement, and thorough knowledge of anatomy are essential for safe and effective surgery.
Indications
Common indications for elbow arthroscopy include:
- Loose bodies (free or attached)
- Primary osteoarthritis with osteophytes
- Osteochondritis dissecans
- Post traumatic stiffness with adhesions and reduced range of motion
- Elbow instability
- Synovial plica syndrome
- Selected elbow fractures
- Synovitis and septic arthritis
- Lateral epicondylitis
Contraindications
Elbow arthroscopy should be avoided or used with caution in:
- Patients unsuitable for general anesthesia
- Extra articular pathology
- Extensive heterotopic ossification
- Previous ulnar nerve transposition due to increased risk of nerve injury
Instrumentation
Essential instruments include:
- Arthroscope: 2.7 mm or 4 mm, 30°
- Blunt and conical cannulas with trocars
- Motorized shaver
- Burrs
- Basket forceps
- Radiofrequency ablation device
- Switching sticks
- Graspers and clamps
- Fluid management system using gravity inflow or arthroscopy pump
Anesthesia
General Anesthesia
Preferred because:
- Provides superior muscle relaxation
- Improves joint distraction
- Facilitates easier arthroscopic access
Regional Anesthesia
Can be used but has limitations:
- May interfere with postoperative neurological assessment
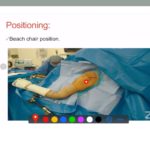
Patient Positioning
Three commonly used positions:
Supine
Advantages:
- Excellent airway access
- Familiar setup
Limitations:
- Posterior compartment access may be less convenient
Prone
Advantages:
- Excellent posterior access
Limitations:
- Airway management more challenging
Lateral Decubitus (Most Commonly Preferred)
Advantages
- Better airway access than prone position
- Excellent access to posterior compartment
- Allows intraoperative flexion and extension
- Usually does not require traction devices
Limitations
- Less airway access than supine position
- Anterior compartment access can be slightly more difficult
- Medial open conversion is more challenging
- Positioning requires greater attention
Lateral Decubitus Setup
Key steps include:
- Placement of an axillary roll
- Use of arm holder or support
- Elbow flexed approximately 90°
- Arm positioned over the edge of the table
- Padding of knees and ankles
- Placement of anterior and posterior bolsters
- Tourniquet inflation typically around 250 mmHg
Surface Anatomy Marking
Before portal creation, the following landmarks should be identified and marked:
- Lateral epicondyle
- Medial epicondyle
- Olecranon
- Radial head
- Ulnar nerve
Identification of the ulnar nerve is critical to prevent iatrogenic injury.
Standard Arthroscopic Portals
Posterior Compartment
Direct Posterior Portal
Also known as the trans triceps portal.
Uses:
- Posterior compartment access
- Instrumentation
Proximal Posterolateral Portal
Most commonly used as the viewing portal.
Lateral Portal
Soft Spot Portal
Located within the triangle formed by:
- Radial head
- Olecranon tip
- Lateral epicondyle
Uses:
- Access to radiocapitellar joint
- Loose body removal
- Assessment of plica and instability
Anterior Portals
Proximal Anteromedial Portal
Also called the superomedial portal.
Anteromedial Portal
Provides access to the anterior compartment.
Proximal Anterolateral Portal
Created under direct arthroscopic visualization.
Distal Anterolateral Portal
Rarely used today because of increased risk to adjacent neurovascular structures.
Neurovascular Structures at Risk
Medial Side
- Ulnar nerve
- Median nerve
- Brachial artery
Lateral and Anterior Side
- Radial nerve
- Posterior interosseous nerve (PIN)
Careful portal placement and joint distension are essential for protection.
Surgical Technique: Step by Step
Step 1: Joint Distension
- Approximately 20 mL saline injected through the soft spot portal
- Expands the capsule
- Increases safety margin from neurovascular structures
Step 2: Creation of First Portal
- Proximal posterolateral portal established
- Arthroscope introduced
Step 3: Posterior Compartment Assessment
Structures visualized:
- Olecranon
- Olecranon fossa
- Trochlea
- Medial gutter
Step 4: Lateral Compartment Assessment
Through the soft spot portal identify:
- Radial head
- Capitellum
- Ulnohumeral articulation
Common procedures:
- Synovial plica excision
- Loose body removal
- Instability assessment
Step 5: Anterior Compartment Assessment
Portal sequence:
- Anteromedial portal
- Proximal anterolateral portal under direct visualization
Structures visualized:
- Coronoid process
- Trochlea
- Coronoid fossa
- Radial head
- Capitellum
Practical Pearls
- Always identify and mark the ulnar nerve before portal placement.
- Adequate joint distension improves safety.
- Create anterior portals under direct arthroscopic visualization.
- Maintain awareness of nerve proximity, particularly during anterior portal creation.
- A systematic approach of posterior, lateral, then anterior compartment evaluation improves orientation.
Clinical Pearl
Elbow arthroscopy is one of the most technically challenging arthroscopic procedures because:
- The joint space is small.
- The capsule is tight.
- Major neurovascular structures lie immediately adjacent to the working portals.
Successful outcomes depend on meticulous portal placement, sound anatomical knowledge, and experience with elbow arthroscopy.
Courtesy: Cristina Zolog, Wuppertal, Germany


Leave a Reply